Solar Camera Installation Mistakes That Cost South Africans Their Security
Most people buy a solar security camera, slap it up on the wall in 20 minutes, and think they’re done. Then three months later they’re wondering why their footage is blurry, why the battery dies at midnight, or why the camera missed the guy who jumped their wall at 2am. Solar camera installation mistakes are more common than you’d think — and most of them are completely avoidable. This article covers the mistakes Zack sees over and over, and exactly how to fix each one before it costs you.
The Ultimate Guide to Solar Security Cameras in South Africa
Why Solar Camera Installation Mistakes Are So Common in South Africa
Solar camera installation mistakes happen because most people treat these cameras like they’re plug-and-play toys. They’re not — they’re outdoor security devices that need to be positioned, configured, and maintained correctly to do their job. South Africa’s specific conditions make this even more important: intense summer heat, dusty Highveld wind, heavy Cape rain, and unpredictable load shedding all affect how your camera performs. A camera that works perfectly in a YouTube review filmed in Europe may fail quietly on your boundary wall if you’ve made any of the common mistakes below.
The other reason mistakes happen is that the manuals supplied with budget solar cameras are often poorly translated and skip critical setup steps. Most people don’t read them anyway. So let’s fix that right now.
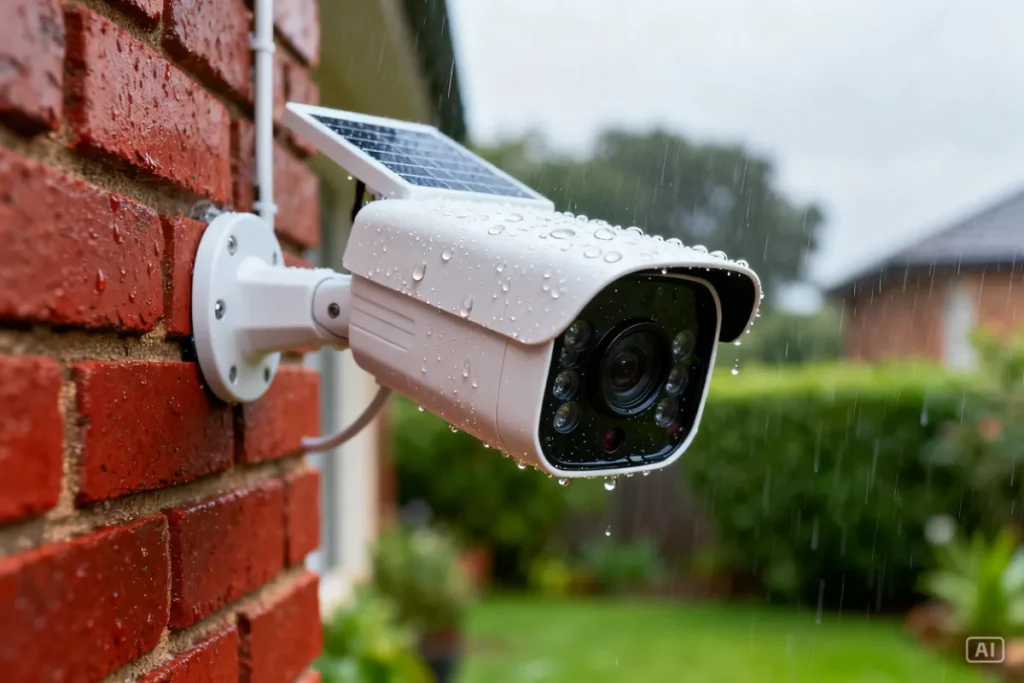
Mistake 1: Choosing the Wrong Mounting Position
The wrong mounting position is the single most damaging solar camera installation mistake you can make, because it affects everything — solar charging, image quality, WiFi signal, and weatherproofing. A bad position can’t be fixed by any app setting or firmware update.
The most common positioning errors:
- Too high — Above 3.5 metres, you lose facial detail. You’ll capture the tops of heads instead of faces, which makes footage useless for identification. The sweet spot is 2.5–3 metres.
- Facing direct sunlight — A camera lens pointed east or west will be blinded by morning or afternoon sun, washing out your footage exactly when activity is highest.
- Under a roof overhang — Looks protected, but shades the solar panel and kills charging efficiency. The camera will run flat by midnight.
- Behind a tree or wall — Partial shade from a tree or fence reduces solar output dramatically. Even 30% shade can cut charging by half.
The fix: Before you drill a single hole, spend five minutes at your chosen spot at different times of day. Check where the sun hits, confirm your WiFi signal strength on your phone, and walk through the intended field of view to make sure it covers what matters.

Mistake 2: Ignoring the 2.4GHz WiFi Requirement
This is the mistake that makes people think their brand-new camera is broken. They spend 45 minutes trying to pair it, fail, and either return the camera or give up. The camera is almost never the problem — the WiFi band is.
Almost all budget and mid-range solar cameras only support 2.4GHz WiFi networks. Modern routers broadcast both 2.4GHz and 5GHz, and most smartphones automatically connect to 5GHz because it’s faster. When you try to pair your camera while your phone is on 5GHz, the setup fails because the camera can’t see that network at all. It’s one of the most frustrating solar camera installation mistakes precisely because it’s invisible — nothing tells you this is the issue.
The fix: Before pairing, go into your phone’s WiFi settings and manually connect to your router’s 2.4GHz network (it’s usually labelled differently — check your router). Complete the entire camera pairing process on 2.4GHz. Once paired, your phone can switch back to 5GHz and the camera will stay connected independently.
Mistake 3: Skipping the SD Card
A surprising number of people buy a solar camera and never insert an SD card. They rely entirely on cloud storage — which sounds fine until load shedding knocks out their router, their data runs out, or their internet goes down. During that window, the camera is recording to nothing.
Cloud storage is a backup, not a primary system. Your SD card is your primary storage, and without it you have a security gap every time your WiFi drops. In South Africa, where load shedding can take your router offline for 2–4 hours at a time, this is a serious vulnerability. It’s one of the solar camera installation mistakes that seems minor until the night you actually need that footage and it doesn’t exist.
The fix: Buy a Class 10 or U3 micro SD card (32GB minimum, 64GB recommended) at the same time as your camera. Insert it before you power the camera on for the first time. Format it through the app once the camera is live. Done — your footage now saves locally regardless of what Eskom or your ISP does.
Mistake 4: Not Checking Weatherproofing Before Mounting
South Africa’s weather is not gentle. Joburg summer storms dump 50mm of rain in an hour. Cape Town winters bring sustained cold and wet conditions. Durban’s coastal humidity corrodes electronics faster than anywhere inland. Mounting a camera without checking its IP rating first is one of the solar camera installation mistakes that only reveals itself months later — when water gets in and the camera stops working permanently.
IP Ratings explained simply:
| IP Rating | Protection Level | Suitable For SA Use? |
|---|---|---|
| IP54 | Splash resistant | Indoor/covered outdoor only |
| IP65 | Dust tight + low-pressure water jets | Good for most SA conditions |
| IP66 | Dust tight + powerful water jets | Recommended for open exposure |
| IP67 | Dust tight + short immersion | Best for coastal or high-rain areas |
The fix: Check the IP rating before you buy. For outdoor South African use, don’t go below IP65. For coastal areas (Durban, Cape Town) or locations with direct rain exposure, IP66 or IP67 is worth the extra cost.
Mistake 5: Poor Cable and Port Management
Even wireless solar cameras have a charging port, a reset button, and sometimes a cable between the panel and the camera body. Leaving these exposed is one of the solar camera installation mistakes that invites water damage, insect nesting, and camera theft by giving someone an easy pull-point.
Many people also leave excess cable dangling loosely down the wall. This looks untidy, but more importantly it gives someone something to grab and yank, which can pull the entire camera mount loose. In high-crime areas, a dangling cable is also a visual invitation to mess with your setup.
The fix: Use the rubber port covers supplied with the camera — they’re there for a reason. Secure any cable between the solar panel and camera body with outdoor-rated cable clips along the wall. If no clips are supplied, pick them up from any hardware store for a few rand. Neat cable management also makes your installation look professional, which subtly signals to would-be intruders that your security setup is serious.
Mistake 6: Setting Motion Detection Sensitivity Too High or Too Low
This is a software mistake but it starts at installation time, when most people just leave the default settings and never touch them again. Too high a sensitivity means you get 40 motion alerts a day from passing cars, blowing leaves, and neighbourhood cats. You start ignoring the alerts — and then you miss the real one. Too low, and a person can walk through your camera’s field of view without triggering anything.
The fix: After mounting, spend 10 minutes adjusting your motion detection zones and sensitivity in the app. Most cameras let you draw specific zones — set them to cover only the areas that matter (your gate, your door, your driveway) and exclude the street beyond your property. Set sensitivity to medium as a starting point, then adjust based on the false alerts you receive over the first week. This single step makes your camera dramatically more useful.
For a step-by-step guide on getting your camera live and configured after avoiding these mistakes, read our Wireless Solar Camera Setup article.
Mistake 7: Never Cleaning the Solar Panel
This one sounds obvious, but almost nobody does it. A solar panel covered in dust, bird droppings, or Highveld grime charges at a fraction of its rated capacity. In Gauteng especially, dust accumulation is rapid — a panel that’s been up for three months without cleaning can be operating at 60–70% efficiency. That translates directly to your camera dying earlier each night and potentially going offline before sunrise.
The fix: Wipe the solar panel with a damp cloth once a month. It takes 60 seconds. That’s it. Don’t use harsh chemicals or abrasive cloths — warm water and a soft cloth is all you need. Make it part of your monthly routine and your camera will perform consistently year-round.
Solar Camera Installation Mistakes vs Correct Practice: Quick Reference
| Mistake | Correct Practice |
|---|---|
| Mounting above 3.5 metres | Mount at 2.5–3 metres for facial detail |
| Pairing on 5GHz WiFi | Switch to 2.4GHz before pairing |
| No SD card inserted | Use 32GB–64GB Class 10 micro SD |
| IP54 camera in open outdoor position | Use IP65 minimum for SA outdoor use |
| Loose cables and exposed ports | Clip cables, fit rubber port covers |
| Default motion detection settings | Configure zones and sensitivity in app |
| Never cleaning solar panel | Wipe panel with damp cloth monthly |
For a complete buying guide that helps you avoid getting stuck with an under-spec camera in the first place, the Ultimate Guide to Solar Security Cameras in South Africa covers every feature you need to check before spending a rand.
Zack’s Verdict
Most solar camera installation mistakes come down to rushing the job. People spend R1,500 on a camera and then spend 20 minutes on the installation — and then wonder why it’s not performing six months later. Take an extra hour upfront: check your mounting position, sort out your WiFi band, insert your SD card, and spend five minutes on your motion detection settings. Do that, and your camera will protect your property reliably for years. Skip it, and you’ve bought an expensive piece of plastic that gives you false confidence. Your security is worth doing properly — don’t cut corners on the installation. If you want a camera that’s built to handle SA conditions right out of the box, check out our range at Zacks Bargains.
Frequently Asked Questions About Solar Camera Installation Mistakes
Q: Why does my solar camera keep going offline at night? This is almost always a solar panel issue — either it’s shaded during the day, dirty, or angled incorrectly and not charging fully. Check that your panel gets 4–6 hours of direct sunlight daily and wipe it clean. If the problem persists, the battery may need replacement.
Q: Why did my camera pairing fail during setup? Nine times out of ten, this is the 5GHz WiFi issue. Make sure your phone is connected to your router’s 2.4GHz band during the entire pairing process. If you’re still struggling, move closer to the router to eliminate signal distance as a factor.
Q: Does it matter which direction my camera faces? Yes — significantly. Avoid pointing the camera directly east or west where sunrise and sunset will blind the lens. North or south-facing positions generally give the most consistent image quality throughout the day in South Africa.
Q: My camera triggers alerts constantly — what’s wrong? Your motion sensitivity is set too high or your detection zone is too broad. Open the app and narrow your motion zone to exclude the street, trees, and other high-movement areas outside your property. Drop the sensitivity one level and monitor for a week.
Q: Is it okay to mount my camera under a roof overhang for protection? Only if the solar panel still gets direct sunlight. Many cameras have a separate panel on a short cable — you can mount the camera body under the overhang and position the panel in full sun. If the panel is integrated into the camera body, avoid overhangs entirely.
Q: Do I need to weatherproof the mounting bracket as well? For long-term installations, yes. A dab of silicone sealant around your wall plugs and screw holes prevents water from tracking behind the bracket and damaging your wall. It also locks the mount in place and protects against rust on the screws.
Conclusion
Avoiding solar camera installation mistakes is the difference between a security system that actually protects your home and one that just looks like it does. Get your mounting position right, sort your WiFi band before you start, insert that SD card, and keep your solar panel clean. These aren’t complicated fixes — they’re small habits that make a big difference over time. Browse the full range of load-shedding-proof solar cameras at Zacks Bargains and protect your property the smart way.


