How to Do a Wireless Solar Camera Setup the Right Way
If you’ve been putting off securing your property because you don’t want the hassle of drilling walls and running cables, a wireless solar camera setup is exactly what you need. These cameras are designed for South African conditions — they run on solar power, connect to your WiFi, and can be mounted almost anywhere without an electrician. No Eskom dependency, no complicated wiring, just a camera that works even when the grid doesn’t.
What Is a Wireless Solar Camera Setup and How Does It Work?
A wireless solar camera setup combines a solar panel, a rechargeable battery, and a WiFi-connected camera in one unit. The solar panel charges the battery during the day, and that stored power keeps the camera running through the night and during load shedding. Your phone connects to the camera via a dedicated app, so you can check your property from anywhere in South Africa — or anywhere in the world.
Most setups work in three parts: the camera unit itself, a small solar panel (either built-in or attached via a short cable), and your home WiFi network. Some models also support a SIM card as a backup connection, which is a smart option for areas where WiFi signal is weak. Once installed and connected, the camera sends motion alerts, live footage, and recorded clips straight to your phone.
What You’ll Need Before You Start Your Wireless Solar Camera Setup
Before you mount anything, make sure you have everything ready. Running back to the hardware store halfway through a setup is frustrating and avoidable.
Equipment checklist:
- Solar WiFi security camera (with solar panel included or separate)
- Wall plugs and screws (usually supplied)
- Power drill or hammer and nail
- Smartphone with the camera’s app installed
- Your home WiFi password (2.4GHz — most cameras don’t support 5GHz)
- A ladder if mounting at height
One important SA-specific note: check your WiFi band before you start. Most budget solar cameras only connect to 2.4GHz networks, not 5GHz. If your router broadcasts both, make sure your phone is connected to the 2.4GHz band when you’re pairing the camera — otherwise the setup will fail and you’ll think the camera is broken when it isn’t.
Step-by-Step: How to Complete Your Wireless Solar Camera Setup
Follow these steps in order and your camera will be live within 20–30 minutes.
Step 1 — Download the app first Before you even take the camera out of the box, download the manufacturer’s app (usually listed on the box or in the manual). Create your account and have it ready. Trying to do this after mounting the camera wastes time.
Step 2 — Charge the battery before mounting Most solar cameras ship with a partially charged battery. Plug the camera in via USB or leave it in direct sunlight for 4–6 hours before installation. This ensures the first boot-up is smooth and the camera doesn’t power off mid-setup.
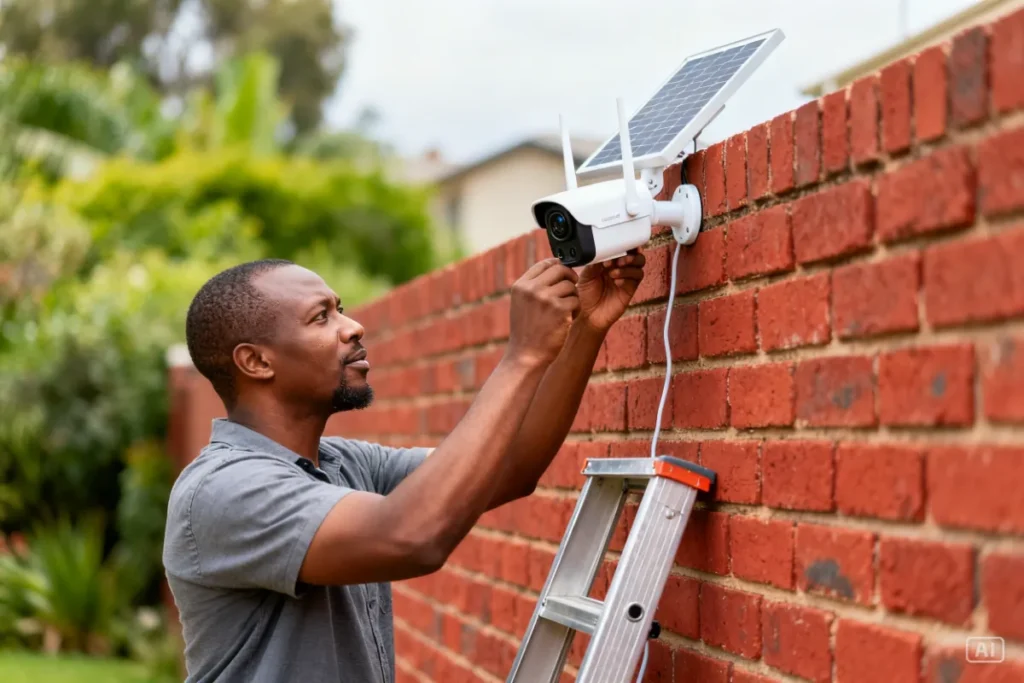
Step 3 — Choose your mounting position Pick a spot that gets at least 4–6 hours of direct sunlight daily. South-facing walls and gate posts work best in South Africa. Make sure the camera’s field of view covers the area you want — entrances, driveways, and gate areas are the highest priority. Don’t mount too high; 2.5–3 metres is the sweet spot for clear facial recognition.
Step 4 — Mount the bracket Use the supplied template to mark your drill holes. On brick or plaster walls, use a masonry drill bit. Insert the wall plugs, screw in the bracket, and attach the camera. Give it a firm tug to confirm it’s secure before moving on.
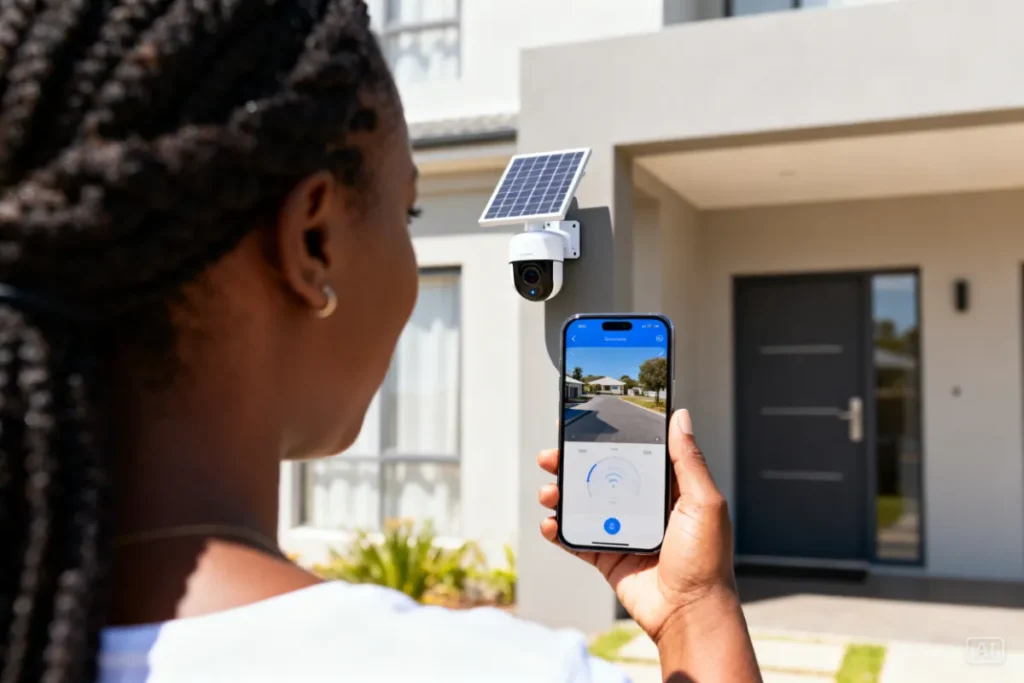
Step 5 — Connect to WiFi Open the app and follow the pairing instructions. This usually involves scanning a QR code on the camera or pressing a reset button. Make sure your phone is on 2.4GHz WiFi during this step. Once paired, the app will confirm the connection and you’ll see your first live view.
Step 6 — Configure your settings Set your motion detection sensitivity, notification preferences, and recording schedule. For SA conditions, enable the night vision mode and set motion alerts for after sunset. If your camera supports it, create motion zones so you’re only alerted to movement in specific areas — this cuts down on false alerts from trees and passing cars.
Step 7 — Test everything Walk through the camera’s field of view and confirm you receive a motion alert on your phone. Check the live feed, the night vision quality, and the app’s playback function. If your camera supports cloud or SD card storage, confirm recordings are saving correctly.
Best Locations for a Wireless Solar Camera Setup in South Africa
Placement matters more than most people realise. A camera in the wrong spot gives you footage of a wall or a tree instead of an intruder’s face.
Top mounting locations for SA homes:
| Location | Why It Works | SA-Specific Tip |
|---|---|---|
| Front gate / driveway entrance | Covers main access point | Angle to capture vehicle plates |
| Back yard / garden | Catches perimeter breaches | Pair with motion-activated light |
| Garage door | High-value target area | Mount at 2.5m for best angle |
| Side alley | Blind spot on most properties | Wide-angle lens works best here |
| Boundary wall | Wide coverage of street activity | South-facing for best solar charge |
Avoid mounting cameras where the solar panel will be permanently shaded by a roof overhang or large tree. A camera that doesn’t charge properly during the day will have dead battery by 2am — exactly when you need it most.
Common Wireless Solar Camera Setup Mistakes to Avoid
These are the mistakes Zack sees people make over and over — and they’re all avoidable.
Mistake 1: Connecting to 5GHz WiFi As mentioned, most solar cameras need 2.4GHz. If pairing fails, this is almost always the reason. Switch your phone’s WiFi band and try again before assuming the camera is faulty.
Mistake 2: Mounting in a shaded spot A camera under a roof overhang or behind a tree won’t charge properly. Even partial shading significantly reduces solar panel output. Test the sun exposure at your chosen spot before drilling.
Mistake 3: Mounting too high People think higher means safer from theft and better coverage. In reality, above 3.5 metres you lose facial detail. Mount between 2.5–3 metres for the best balance of security and image quality.
Mistake 4: Skipping the SD card Cloud storage is convenient but depends on WiFi and data. Always insert a 32GB or 64GB micro SD card so footage is saved locally even if your WiFi goes down during load shedding.
Mistake 5: Not testing night vision Set up during the day, test at night. Night vision range and quality vary between cameras. Walk through the frame after dark and check the footage — don’t assume it works until you’ve confirmed it.
For a full comparison of solar camera models that work best in SA conditions, check out our 4K Solar Camera guide before you buy.
How Wireless Solar Camera Setup Compares to Wired CCTV
A lot of homeowners ask whether going wireless is worth it compared to a traditional wired CCTV system. The honest answer depends on your situation.
| Feature | Wireless Solar Camera Setup | Wired CCTV System |
|---|---|---|
| Installation difficulty | DIY — 20–30 minutes | Requires electrician/installer |
| Load shedding proof | Yes — runs on solar battery | No — needs UPS or generator |
| Running cost | R0 — solar powered | Electricity cost ongoing |
| Image quality | Good to excellent (1080p–4K) | Excellent |
| Flexibility / portability | High — easy to reposition | Low — fixed cabling |
| Upfront cost | R800–R3,000 per camera | R5,000–R15,000+ full system |
| Data storage | SD card + cloud | NVR/DVR hard drive |
For most South African homeowners, especially renters and those in areas with regular load shedding, the wireless solar option wins on practicality and cost. You can find everything you need to know in the Ultimate Guide to Solar Security Cameras in South Africa, which covers every camera type, price range, and use case in one place.
Maintaining Your Wireless Solar Camera After Setup
Setup is the easy part — keeping your camera performing well over months and years takes a little ongoing attention. The good news is it’s minimal effort.
Monthly: Wipe the solar panel with a damp cloth to remove dust, bird droppings, and grime. A dirty panel can reduce charging efficiency by 20–30%, which directly affects how long your camera runs overnight.
Every 3 months: Check the camera housing for water ingress, loose screws, or corrosion — especially after the summer rainy season. South African weather is tough on outdoor electronics. Also check your app for firmware updates and install them when available.
Annually: Test the battery health. Most solar camera apps show battery percentage — if you’re noticing the camera dying earlier than it used to, the battery may need replacement or the panel may need repositioning for better sun exposure.
For the full maintenance checklist, read our Solar Security Camera Maintenance article.
Zack’s Verdict
Wireless solar camera setup is one of the best DIY security upgrades you can do for under R2,000. There’s no electrician needed, no ongoing electricity cost, and no Eskom drama — your camera keeps recording whether you’re on Stage 4 or Stage 6 load shedding. The setup process is straightforward if you follow the steps above, and the most common problems (WiFi band issues, shaded mounting spots) are easy to avoid once you know what to look for. Stop waiting for a “proper” security system that costs R20,000 and six weeks to install. Get a solar camera, mount it this weekend, and sleep better on Sunday night. If you’re not sure which camera to buy first, check out our Solar WiFi Security Camera range at Zacks Bargains.
Frequently Asked Questions About Wireless Solar Camera Setup
Q: Do I need an electrician to install a wireless solar camera? No — that’s the whole point. Wireless solar cameras are designed for DIY installation. All you need is a drill, the supplied screws and brackets, and your smartphone to complete the setup. Most people have their camera live within 30 minutes.
Q: What WiFi speed do I need for a wireless solar camera setup? A basic broadband connection works fine for most cameras. You need enough speed to stream live footage on your phone — typically 2Mbps upload speed is sufficient. The bigger requirement is WiFi band: your camera needs 2.4GHz, not 5GHz.
Q: Will my solar camera work during load shedding? Yes. The camera runs on its own rechargeable battery charged by the solar panel — it doesn’t use your home’s electricity at all. As long as the battery is charged, the camera records and sends alerts regardless of load shedding stage.
Q: How far does the WiFi signal need to reach? Your camera needs a stable WiFi signal at the mounting location. Most home routers cover 20–30 metres indoors, but walls and distance reduce this outdoors. If your signal is weak at the mounting spot, consider a WiFi extender or a camera with SIM card backup.
Q: Can I install multiple cameras on the same app? Yes — most solar camera apps support multiple devices under one account. You can monitor your front gate, backyard, and garage from a single dashboard on your phone.
Q: What happens to recordings during load shedding if my WiFi router goes down? If your router loses power during load shedding, the camera will continue recording to the SD card locally. Cloud uploads will resume once your router comes back online. This is why an SD card is non-negotiable.
Q: How much sun does the solar panel need each day? Most solar cameras need 4–6 hours of direct sunlight to fully charge. South Africa’s climate makes this very achievable for most of the year, even in winter. Johannesburg, Cape Town, and Durban all average well above this threshold daily.
Conclusion
A wireless solar camera setup is one of the smartest, most cost-effective security moves a South African homeowner can make right now. It’s load-shedding proof, DIY-friendly, and costs a fraction of a traditional CCTV system. Follow the step-by-step process above, avoid the common mistakes, and you’ll have a fully functioning system protecting your property this weekend. Browse the full range of solar security cameras at Zacks Bargains and find the right camera for your home, gate, or business.


