Solar Camera Installation Guide — How to Set One Up Yourself in South Africa
Installing a solar security camera yourself is genuinely one of the easiest home security upgrades you can make. No wiring, no electrician, no cutting holes in walls. Most setups take under 30 minutes with a drill and a screwdriver — and once it’s up, it runs itself. This guide walks you through the full process, from choosing your mounting spot to getting live footage on your phone, in plain South African language.
If you’ve already read our article on [how solar cameras work], you’ll know the technology is solid. Now let’s get yours up and running.
What You’ll Need Before You Start
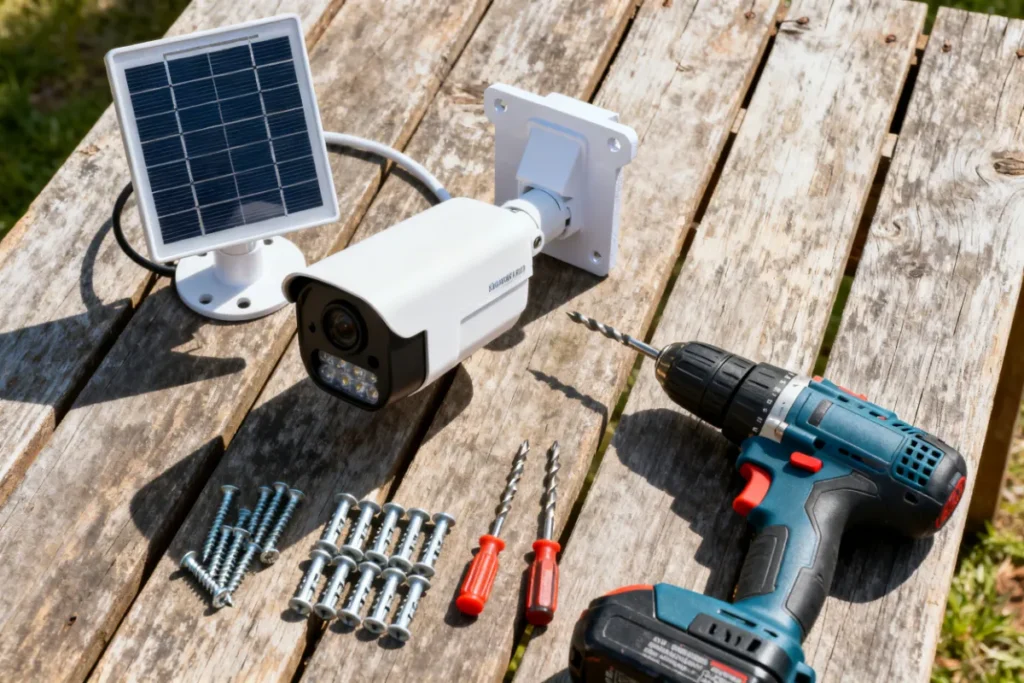
You don’t need much — that’s the beauty of a wireless solar setup. Before you climb a ladder, gather everything listed below so you’re not making trips back to the garage halfway through the job.
Most solar cameras come in the box with a mounting bracket, screws, wall anchors, a charging cable, and sometimes a small screwdriver bit. Check your box contents against this list and grab anything that’s missing before you start:
- ✅ Your solar security camera and mounting bracket
- ✅ Power drill + masonry bit (6mm for most wall anchors)
- ✅ Screwdriver (Phillips head)
- ✅ Spirit level or spirit level app on your phone
- ✅ Pencil for marking drill points
- ✅ Ladder (if mounting high)
- ✅ Your WiFi password
- ✅ Smartphone with the camera’s companion app installed
Download and open the companion app before you go outside. The app setup — creating an account, adding the camera — is quicker to do indoors where you can see your phone screen properly.
Step 1 — Choose the Right Mounting Location
Your mounting location is the most important decision in this entire process. A camera in the wrong spot — even an expensive one — gives you poor coverage and poor solar charging. Get this right first and everything else is straightforward.
For camera coverage, you want to cover your highest-risk entry points: the front gate, main driveway, and garage door. Position the camera at a height of 2.5–3.5 metres — high enough that it can’t be easily grabbed or sprayed, but low enough to capture useful facial detail. Point it slightly downward at roughly a 15–30 degree angle for the best field of view.
For solar panel charging, the panel must face north (this is South Africa — north gets the sun, not south). Make sure the chosen spot isn’t shaded by a roof overhang, pergola, large tree, or wall for most of the day. Even 3–4 hours of direct sun per day is enough for most cameras to maintain a full charge, but more is always better.
Quick location checklist before you drill:
- ✅ Covers a high-priority entry point
- ✅ Mounted at 2.5–3.5 metres height
- ✅ Panel faces north with no major shade obstacles
- ✅ Within WiFi signal range (test with your phone at that spot)
- ✅ Not directly above a sprinkler or under a dripping gutter
Step 2 — Set Up the App and Create Your Account
Before you mount anything, get the app side sorted. This saves a lot of frustration later — you don’t want to be standing on a ladder trying to type a password with one hand.
Find your camera’s companion app name in the manual or on the box (common apps include Reolink, eWeLink, Tuya Smart, or the brand’s own app). Download it, create your account, and have it open and ready on the camera-addition screen. Some cameras require you to scan a QR code on the camera body during setup — easier to do before it’s bolted to a wall three metres up.
Also confirm your WiFi at this stage. Solar cameras connect to 2.4GHz WiFi only — not 5GHz. If your router broadcasts both frequencies under the same name, you may need to temporarily separate them in your router settings. This trips up more SA buyers than anything else during installation. If your phone shows “authentication failed” or “connection timeout” during camera setup, the 2.4GHz issue is almost always the cause.
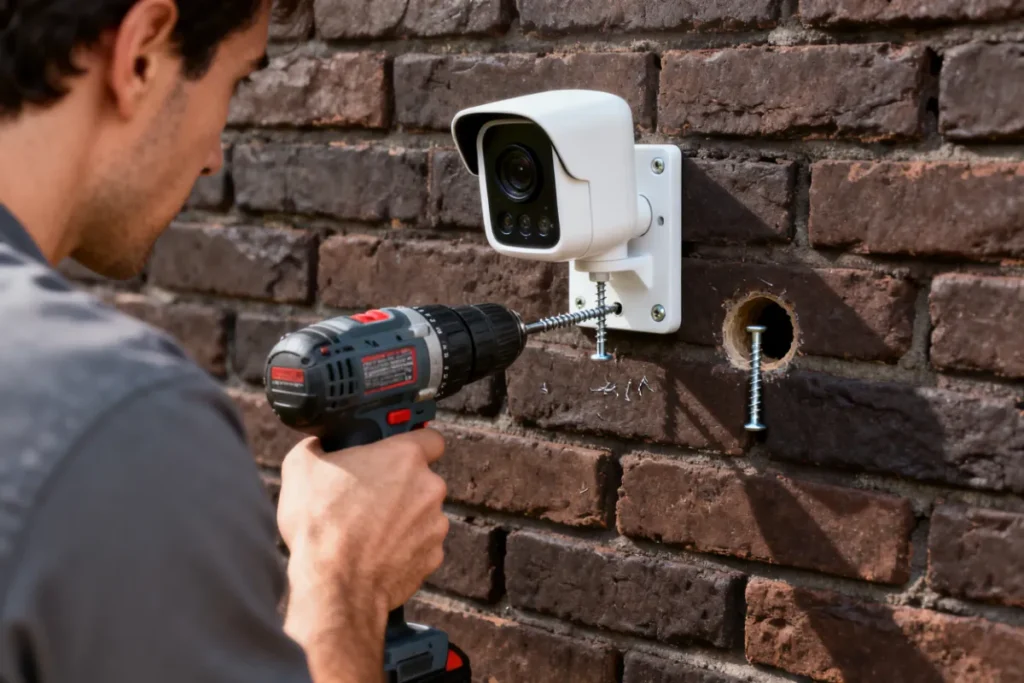
Step 3 — Mark and Drill Your Mounting Holes
With your location confirmed and app ready, it’s time to put the bracket up. Hold the mounting bracket against the wall at your chosen position and use a pencil to mark through the bracket holes onto the surface. Use a spirit level to make sure the bracket is perfectly horizontal before marking — a crooked camera looks unprofessional and affects the field of view.
Drill your marked holes with a masonry bit to the depth of your wall anchors (usually 30–40mm). Tap the plastic wall anchors into the holes flush with the surface. Insert and tighten the screws through the bracket into the anchors. Give the bracket a firm tug once installed — it should have zero movement. If it wobbles, the anchors haven’t seated properly; remove and re-drill slightly deeper.
Surface-specific tips:
| Surface | Tip |
|---|---|
| Brick / plaster | Standard masonry bit, no special prep needed |
| Face brick | Drill into the mortar joint — easier and holds just as well |
| Concrete | Use a hammer drill setting if available — saves time and effort |
| Wooden fascia board | Use wood screws directly, no anchors needed |
| Precast concrete wall | Use a concrete anchor bolt for extra holding strength |
Step 4 — Attach the Camera and Angle It Correctly
With the bracket secured, clip or screw the camera onto it according to your model’s design. Most solar cameras use a ball-joint mount that lets you swivel and tilt the camera independently from the solar panel — which is important because the panel needs to face north while the camera may need to face a different direction entirely.
Set the camera angle first. Point it at the area you want to monitor and use the live view in your app to fine-tune the framing. You want the entry point (gate, door, driveway) in the centre-to-lower portion of the frame, with some sky visible at the top — this helps the camera pick up approaching figures before they reach the entry point.
Once the camera direction is set, adjust the solar panel separately to face as directly north as possible. Tighten all adjustment joints firmly — South African wind and Highveld thunderstorms will loosen anything left loose over time.
Step 5 — Connect to WiFi and Complete App Setup
With the camera physically installed, it’s time to bring it online. Open the app and follow the camera-addition wizard. The process typically looks like this:
- Tap “Add Device” or the “+” icon in the app
- Select your camera model or scan the QR code on the camera body
- Connect to your home WiFi — confirm you’re selecting 2.4GHz
- The camera will beep or flash to confirm it’s connected
- Give the camera a name (“Front Gate” / “Driveway” / “Garage”)
- Enable motion detection and set your sensitivity level
- Set up push notifications so alerts come straight to your phone
Test the live view from inside the app. Walk in front of the camera and confirm motion detection is triggering correctly. Adjust the sensitivity if you’re getting false alerts from passing cars or blowing trees — most apps let you set detection zones so only movement in a specific area triggers an alert.
Step 6 — Test Everything Before You Pack Up
Don’t pack your tools away until you’ve run through this final checklist. It takes five minutes and saves you from climbing back up the ladder later.
Walk around the full detection zone of your camera — check that motion alerts are arriving on your phone in real time. Check the night vision by shading the lens with your hand to trigger the IR switch and confirm the image stays clear. Open the battery status in the app and confirm the solar panel is showing as charging (if you’re installing during daylight hours, it should be).
If your camera has an SD card slot, insert a card now and confirm local recording is enabled. This is your backup if load shedding cuts your router and you lose cloud sync temporarily. For more detail on how to maximise your camera’s battery performance in SA conditions, read our article on [solar camera battery life explained].
Common Solar Camera Installation Mistakes to Avoid
Most installation problems in South Africa come down to the same handful of errors. Avoid these and your camera will work perfectly from day one.
| Mistake | Why It’s a Problem | Fix |
|---|---|---|
| Panel facing south | Minimal sun exposure, battery drains fast | Always face the panel north |
| Installing in a shaded spot | Insufficient charging even in summer | Test the location at midday before drilling |
| Connecting to 5GHz WiFi | Camera won’t connect — most are 2.4GHz only | Select 2.4GHz band during setup |
| Mounting too low (under 2m) | Camera can be grabbed, covered, or vandalised | Mount at 2.5–3.5m minimum |
| Not tightening the ball joint | Camera shifts position in wind or rain | Tighten all joints firmly after final angle set |
| Skipping the SD card | No local backup during load shedding WiFi outages | Insert SD card during installation |
| Placing directly under guttering | Water damage to camera housing over time | Move at least 30cm away from gutters |
For a full breakdown of what goes wrong with solar camera installs — and how to fix them — check out our dedicated article on [solar camera installation mistakes].
Zack’s Verdict
This is genuinely a one-person, one-morning job. You don’t need to call anyone, you don’t need to spend money on an installer, and you definitely don’t need an electrician. The only thing that trips people up consistently is the 2.4GHz WiFi issue — so check that before you start and you’ll sail through the rest. Get the mounting location right, face the panel north, tighten everything properly, and you’ll have a load-shedding-proof camera keeping an eye on your property before lunch.
Frequently Asked Questions
1. Do I need an electrician to install a solar security camera in South Africa? No. Solar cameras are completely wireless and self-powered. There’s no mains wiring involved at any stage — just a drill, screws, and a WiFi connection. Any competent DIYer can install one without professional help.
2. How high should I mount my solar security camera? Mount between 2.5 and 3.5 metres above ground level. Lower than 2.5 metres and the camera is vulnerable to tampering; higher than 3.5 metres and facial detail becomes difficult to capture. Angle the camera 15–30 degrees downward for the best coverage.
3. Which direction should the solar panel face in South Africa? Always north. South Africa is in the southern hemisphere, so the sun tracks across the northern sky. A north-facing panel gets maximum sun exposure throughout the day. This is the single most important positioning decision for reliable charging.
4. Why won’t my solar camera connect to my WiFi? Almost always a 2.4GHz vs 5GHz issue. Solar cameras only support 2.4GHz WiFi. Check your router settings and ensure you’re connecting to the 2.4GHz band. If your router broadcasts both bands under one name, temporarily split them in your router admin panel during setup.
5. Can I install a solar camera on a precast concrete wall? Yes, but use appropriate concrete anchor bolts rather than standard plastic wall anchors, which won’t grip precast concrete reliably. A hammer drill setting makes the job much easier on this surface.
6. How long does a solar camera installation take? For most people doing it for the first time, allow 30–45 minutes per camera including app setup. Once you’ve done one, subsequent cameras take 15–20 minutes each.
7. Do I need to charge the camera battery before installing? It’s good practice to give it an initial charge via the USB cable before installation — especially if it’s been sitting in a box for a while. Most cameras arrive partially charged, but a full charge before first use extends battery longevity over time.
8. What if my camera loses WiFi during load shedding? If your router goes down during load shedding, your camera continues recording locally to the SD card (if inserted). Once power and WiFi are restored, it syncs footage to the cloud automatically. For 24/7 connectivity during load shedding, consider a camera with SIM card support paired with a mobile data plan.
You’re Set — Now Protect What Matters
A properly installed solar security camera is one of the most effective and affordable home security upgrades available to South African homeowners right now. No ongoing electricity costs, no vulnerability during load shedding, and total visibility of your property from your phone wherever you are. Take your time on the mounting location and the panel direction — get those two things right and the rest looks after itself.
Browse our full range of solar security cameras at Zacks Bargains and find the right fit for your property size and budget. As part of the ultimate guide to solar security cameras in South Africa, this installation guide is your practical starting point — now go get it done.


